Partitioning Scheme
Release 3.3.006 or higher may ask you to perform a partitioning scheme upgrade:
Note
You can of course decide to keep the old partitioning, the module will continue to work using that. But release 3.3.006 will be the last release to fit into the old partitioning scheme, so you will not be able to install any future releases without upgrading.
For details, see: Technical Background
Upgrade Tool
The upgrade can be done online on the running module; release 3.3.006 includes an easy to use upgrade tool that can be run from the shell or the module’s web UI.
The upgrade process takes care of all necessary steps, including rebooting into maintenance mode, copying the running firmware image, changing the partition table and copying the configuration store. The process needs to perform multiple reboots and normally takes around 5 minutes, but can take up to 10 minutes depending on the configuration.
Web UI
Open the tool’s web UI via Config → Partitioning. The tool shows the current state of your system, and
offers to start the upgrade process if necessary:
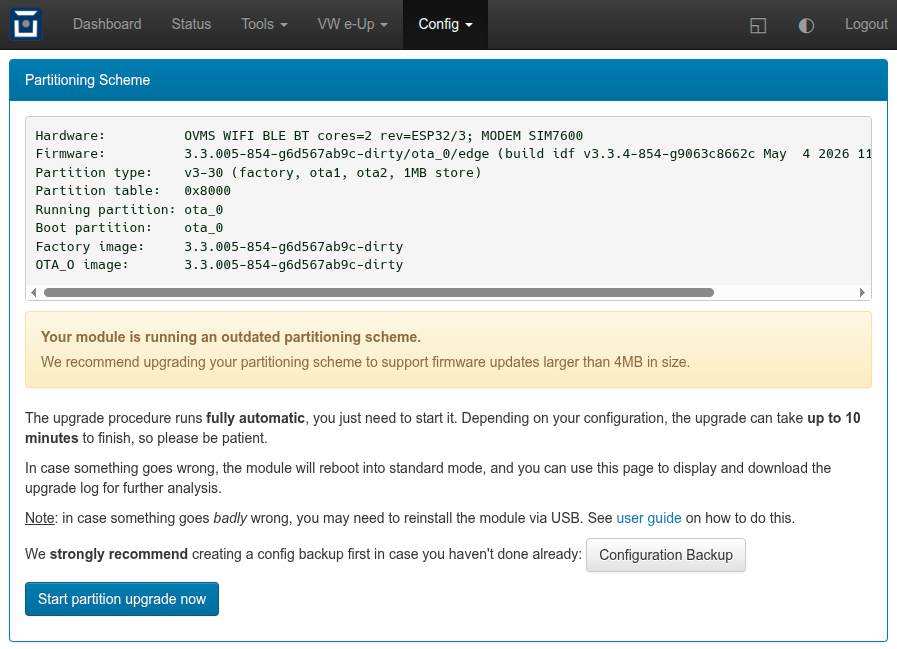
To prepare for any problem, backup your configuration first, in case you didn’t do so lately.
Then click “Start partition upgrade now” and confirm the operation. The UI will display a time estimate with a progress bar and some additional info:
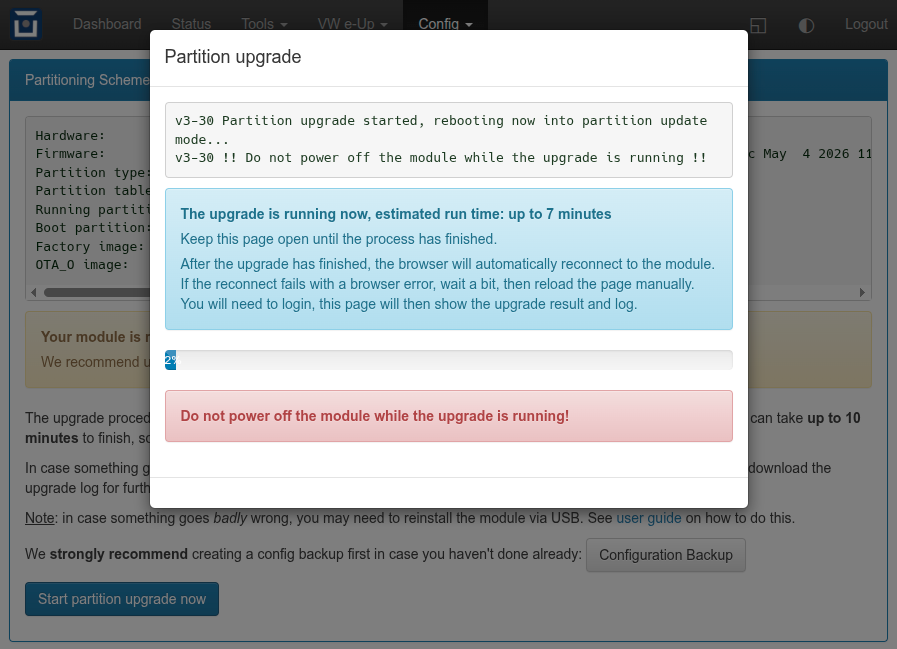
Expect the process to finish earlier than estimated, the estimation is on the conservative side.
Keep the page open until the browser reconnects, after login the page will show the process result, and you’ll be able to download the process log:
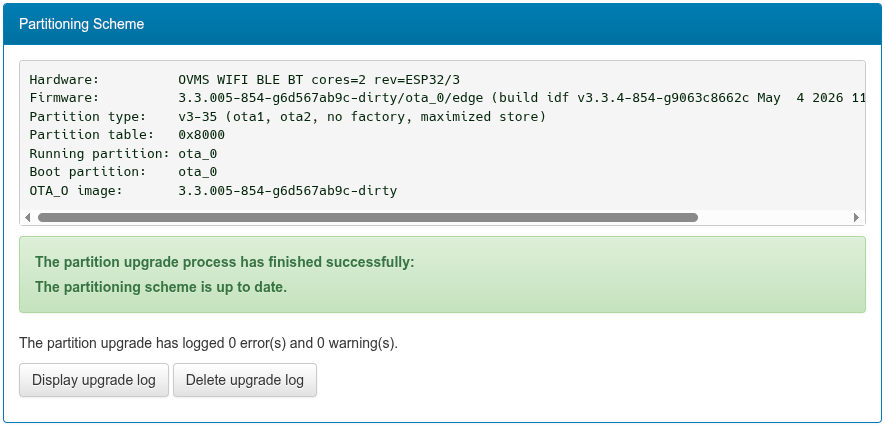
In case the tool encounters an issue with copying the configuration, it will offer to retry copying or perform a factory reset. The upgrade process will automatically continue after the factory reset.
Shell Usage
To prepare for any problem, backup your configuration first, in case you didn’t do so lately. For example:
OVMS# config backup /sd/backup.zip
Change the path as desired. If the backup fails, chances are your config store partition is corrupted. It’s then recommended to do a factory reset first, perform the partition upgrade, then restore your latest backup or setup the module from scratch onto the upgraded system.
To start the partition upgrade, issue:
OVMS# ota partitions upgrade autocont -noconfirm
Note: the -noconfirm option is needed for any remote shell or command channel. With an interactive shell
(USB/SSH), you can omit the parameter, the command will then ask you to confirm.
The command can be run again if needed, it starts by inspecting the current state and then continues to do the next step necessary according to the upgrade plan.
If running this in the USB console, you’ll be able to follow the whole upgrade process by monitoring the USB log output. Once finished, the module reboots into normal operation mode as configured.
If running from a remote shell, you need to wait until the process has finished or aborted (can take up to ten minutes). When the module is back online, check the process result by inspecting the OTA status:
OVMS# ota
If the “partition type” shown is v3-35, the upgrade has finished successfully. If the type is v3-30
or v3-34, or if the module doesn’t come back online, see Troubleshooting.
The upgrade process logs the steps and operations performed in file /store/partition-update.log. To view
the file, issue:
OVMS# vfs cat /store/partition-update.log
In case you need support, copy the log and send it to us, including the ota output and possibly relevant
details on your setup.
Technical Background
The module’s flash memory has a size of 16 MB and is divided into system, firmware and configuration partitions.
Up to release 3.3.005, the partitioning scheme was designed to store three firmware images, with a dedicated “factory” partition to hold the original firmware version flashed during module production, and two “ota” partitions for downloaded updates.
This partition layout supported firmware images up to 4MB in size. This limit was finally reached with release 3.3.006, making 3.3.006 the last release to fit in the old partitioning scheme. To continue being able to install new firmware updates after 3.3.006, the partitioning scheme needs to be changed.
Leveraging the 4MB Limit
While the “factory” partition could still be booted from if manually requested, it wouldn’t receive any updates in normal operation, as it could only be reflashed via USB.
With OTA updates, the module boots alternating from ota_0 and ota_1. New images downloaded or installed
from SD card are only activated after validation, so after successful OTA initialization, one of the OTA
partitions always holds a valid firmware, and factory becomes obsolete.
The new partition layout designed to accomodate updates after 3.3.006 removes the factory firmware
partition and distributes the space gained evenly onto the ota partitions. Unused reserved space of the 4MB
partitioning is also added to the ota and the store partitions to maximize flash memory usage.
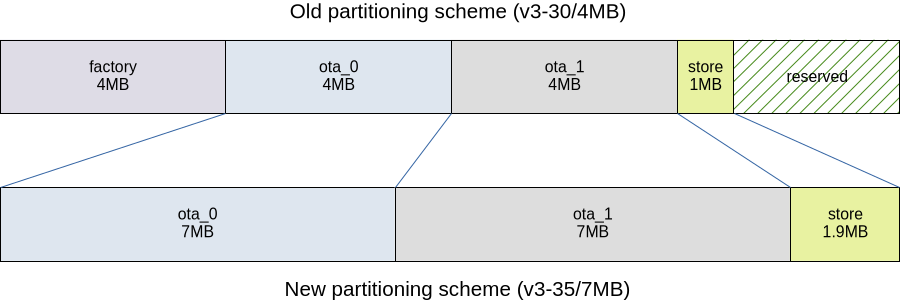
This results in two ota firmware partitions supporting image sizes up to 7MB and a store partition
supporting user configuration data up to 1,984 KB in size.
Old Partition Table
The ota command identifies this as:
Partition type: v3-30 (factory, ota1, ota2, 1MB store)
Label |
Type |
Subtype |
Address |
Size |
|---|---|---|---|---|
nvs |
data |
nvs |
0x00009000 |
16 KB |
otadata |
data |
ota |
0x0000d000 |
8 KB |
phy_init |
data |
phy |
0x0000f000 |
4 KB |
factory |
app |
factory |
0x00010000 |
4 MB |
ota_0 |
app |
ota_0 |
0x00410000 |
4 MB |
ota_1 |
app |
ota_1 |
0x00810000 |
4 MB |
store |
data |
fat |
0x00c10000 |
1 MB |
Hint: use ota partitions list to show the partition table.
New Partition Table
The ota command identifies this as:
Partition type: v3-35 (ota1, ota2, no factory, maximized store)
Label |
Type |
Subtype |
Address |
Size |
|---|---|---|---|---|
nvs |
data |
nvs |
0x00009000 |
16 KB |
otadata |
data |
ota |
0x0000d000 |
8 KB |
phy_init |
data |
phy |
0x0000f000 |
4 KB |
ota_0 |
app |
ota_0 |
0x00010000 |
7 MB |
ota_1 |
app |
ota_1 |
0x00710000 |
7 MB |
store |
data |
fat |
0x00e10000 |
1984 KB |
Troubleshooting
Config Store Corruption
If the upgrade process fails while copying the configuration, the module will reboot into the previous
setup, with OTA partition type v3-34 (factory, ota1, ota2, dual store). This means the upgrade
hasn’t finished yet and needs manual intervention.
You can inspect the process log to see where (on which file/directory) the error was encountered:
OVMS# vfs cat /store/partition-update.log
You may then be able to delete the corrupted file and simply restart the upgrade. This may only work for auxiliary data files or configuration elements you can easily restore later on.
If the corruption is in the protected system configuration directory, or affects more than one file, you’ll
need to perform a factory reset (clearing and reformatting the store partition).
The module will automatically reboot from there and continue with the partition upgrade.
Be aware the module will boot into the initial setup mode after a factory reset, so you will need to
connect to the init Wifi network OVMS using password OVMSinit after the upgrade has finished. You can
then restore a backup or, if no backup is available, reconfigure the module from scratch.
Boot Failure
If the module fails to reboot into normal operation after the upgrade, something went badly wrong when writing the new partition table into the flash memory.
In this case, first try to power cycle the module. If the module still doesn’t recover, you will need to do a full reflash of the module via USB.
We recommend using the most recent firmware image for the full reflash. That way you will automatically get the new partitioning scheme, so no further upgrade is needed.
A full reflash also erases your configuration, so the module will boot into the initial setup mode with Wifi
network OVMS, password OVMSinit. You can then simply restore your latest backup, or reconfigure from
scratch.
Firmware Download
When looking for a specific image to be installed OTA on a module, you now need to choose the right download
directory for the module’s partitioning. On the OTA servers, there are now two firmware directories for each
hardware version, with the one suffixed by -5 for the upgraded partitioning scheme:
v3.3– Hardware 3.3, firmware images with max size 4MBv3.3-5– Hardware 3.3, firmware images possibly exceeding 4MB
Release 3.3.006 and newer will check the image size and cease to install an image exceeding the available partition size. Earlier releases will try to install the image and fail when reaching the partition end.
Standard OTA updates do not need to be changed, they automatically choose the correct directory.
When intending to do a full reflash via USB, you can choose any image, as that includes the partitioning.