REPIDScan: OBD2 PID Scanner UI
Web UI for the OVMS3 RE toolkit’s OBD2 PID scanner
Version 2.1 by Michael Balzer <dexter@dexters-web.de>
1.0: Initial release2.0: Highlight differences between scan results2.1: PID step support
This is a web frontend for the re obdii scan commands.
Some basic usage notes are included, but you really should have some knowlegde of how accessing ECU and other onboard devices via OBD-II/UDS works. Some pointers to get started:
You will need OVMS firmware release 3.2.015-324 or higher to be able to use all features.
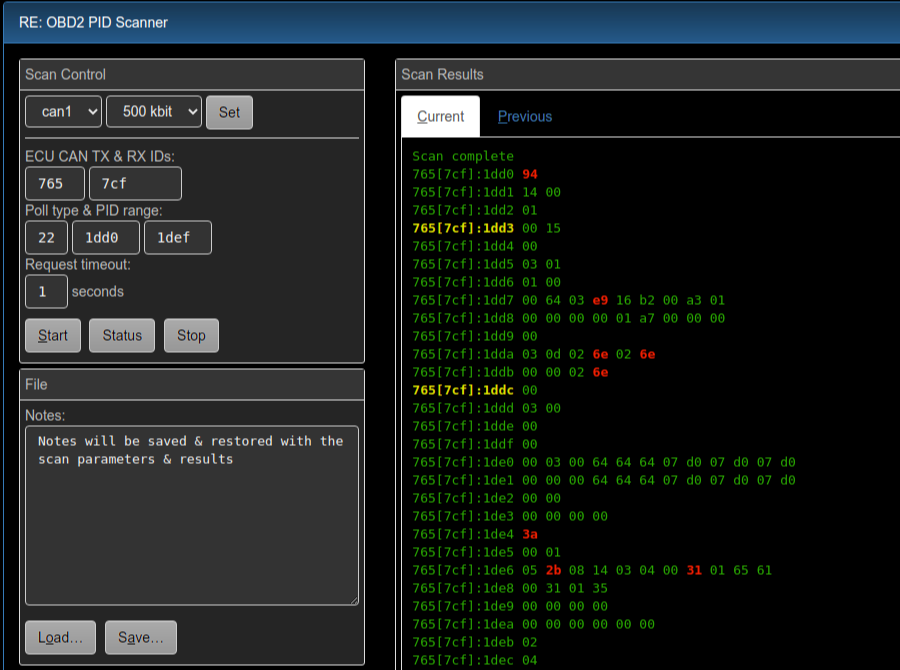
The UI allows to easily define and keep multiple scans along with notes. Scan results of two
successive runs can be compared directly. The UI checks if vehicle NONE is loaded and
shows a button to switch to that otherwise. The CAN buses can be started from the UI as
well.
Scan results are shown in plain text form as delivered by the underlying commands.
Feel free to improve and extend (and submit your results).
Installation
Install
repidscan.htmweb plugin, recommended setup:
Type: Page
Page:
/usr/repidscanLabel: RE PID Scanner
Menu: Tools
Auth: Cookie
Usage
Warning
The scanner allows to use any poll type! Requests will be sent with PIDs only though, but some devices may fail to validate the request length, so be careful not to use any write or control poll types.
The OBD2 PID scanner performs a series of OBD/UDS requests for a range of PIDs and displays the results. Only PIDs with positive results (responses) will be shown in the results.
Enter all values hexadecimal (case irrelevant). Default RXID is TXID+8, try RXID range 500-7FF if you don’t know the responding ID. To send broadcast requests, set TXID to 7DF and RXID to 7E8-7EF. The PID range must match the poll type PID constraints (8/16 bit).
Click “Start” to run a scan. Only one scan can be active at a time, but you don’t need to stop a scan to start another run.
Scan results will be shown automatically when the scan has been completed. Scanning a large range of PIDs may take some time, to get intermediate results, click “Status”. You can also start the scan, do something else and return to the tool later.
Differences between two scans are highlighted in both result tabs, with added PIDs being marked green (yellow in night mode), and byte value changes being marked red. No highlighting is applied if the scans don’t share any PIDs.
On the next scanner start, the previous results (if any) will be copied to the “Previous” tab. You can switch tabs by the mouse or keyboard to compare them and look for differences, e.g. after having changed some control on the car.
All inputs and outputs can be saved to and loaded from files on the module or SD card. Use this to define your areas of interest, so you can easily re-run a previously defined scan the next day. File format is plain readable JSON, so you can continue analysis or prepare scans offline.
Notes: to avoid clashing of scan polls with vehicle polls, use the scanner only with the vehicle
module NONE. The CAN bus to use needs to have been started in active mode. The scanner does not send
session or tester presence messages, if you need these, use the re obdii tester tool or the
obdii canX request command.